Posts Tagged Benefit
Recent Purchases, Part III: The eye make-ups
Posted by Latoya in Benefit, Charlotte Tilbury, Eyeshadow, Giorgio Armani, L'Oreal, MAC, Make-up, Makeup Geek, Mascara on June 23, 2015
In the ongoing chronicle of my intense 3 month makeup haul, next we have all the eye makeup that I bought over the past few months – again, this behaviour was nonsensical as I barely wear eye makeup these days save for mascara, but…sometimes we just lose our damn minds. I’m better now (but still want to atone for my ‘mistakes’).

Let’s begin with the most sensible purchases, given my comment above – mascara.

I went many years without buying much mascara at all – maybe one per year – as I’d often get free ones from Clinique, or just use the samples I’d get from Sephora etc. But this past year I’ve been trialing quite a few drugstore mascaras, as I’ve made an informal, semi-pact with myself that I won’t spend the big bucks on mascara any more; for only 3-4 months of use (and generally the same effectiveness across low- and high-end), my monies are better spent elsewhere.
The first mascara I picked up however, WAS from the higher-end of the spectrum – Benefit’s new Roller Lash mascara ($31CAD) – though I bought it during the Sephora sale in April.
 Benefit Roller Lash Mascara
Benefit’s newest mascara offering claims to be a ‘super-curling and lifting’ mascara to give a ‘sexy, wide-eyed look.’ As my eyelashes are already pretty curly on their own, I wasn’t initially reeled in by the product, but after seeing a few tutorials and reviews online I decided I liked the way it separated and lengthened lashes. Since I tend to go very low-key on the eye makeup day-to-day, I do prefer my lashes to be ultra-defined while letting my lips do the heavy lifting. For me, Roller Lash does the job well – it gives decent length, doesn’t clump and really catches every lash so they stand out, which is important when you’re not wearing anything else on the eye.
 Two coats of Benefit Roller Lash Mascara
Though I am quite enjoying the lengthening and separating effects of Roller Lash, I also wanted to have a more volumizing formula on hand for when I wanted more drama. Enter L’Oreal’s praised Voluminous Million Lashes Excess mascara:
 L’Oreal Voluminous Million Lashes Excess Mascara in Black
The Million Lashes Excess is supposed to give ‘bold volume with clean definition’, and I’d say this is partly true. The formula is thin and wet, so it gives you time to build it up on the lashes without clumping. Because of this, you do get fairly defined lashes – however, it takes effort and several coats to get that ‘bold volume’, at which point the likelihood of clumps increases (though not by too much). I personally find this tedious to apply, and the effect is not dramatic as I’d hoped. Not a bad option though for those who are looking for a reasonably priced mascara with a little bit of drama.
 One coat of L’Oreal Voluminous Million Lashes Excess Mascara
 Two coats of L’Oreal Voluminous Million Lashes Excess Mascara
After watching Tati’s first impressions video on the L’Oreal Voluminous Miss Manga Rock mascara, I went ahead and picked it up when it went on sale at my local Lawtons drugstore. The yet another addition to the Voluminous franchise, Miss Manga Rock is touted to give ‘mega texturized volume’ via a 360° spiked brush and textured formula, creating ‘explosive volume’ at the roots and pointed lash tips.
 L’Oreal Voluminous Miss Manga Rock Mascara in Blackest Black
 One coat of L’Oreal Voluminous Miss Manga Rock Mascara
 Two coats of L’Oreal Voluminous Miss Manga Rock Mascara
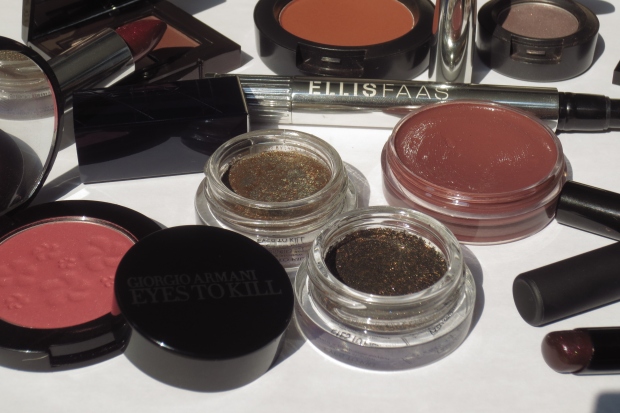
Despite the aforementioned tendency to wear little to no other eye makeup except mascara lately, I still get sucked in by a pretty shadow. I had been on the hunt for a striking gold eyeshadow with almost a greenish tint for month, when I finally stumbled upon Makeup Geek’s Liquid Gold pigment. The price was right (~$6) so I promptly ordered it because, why not?

Shortly thereafter, I went on a MAC craze, listing all the products I *needed* to buy from the core range. I planned to buy a few every couple months or so, and one of the first on my list was the subtle highlight eyeshadow in Ricepaper (frost), and a couple months later I followed my plan and picked up Cork satin eyeshadow, which I though would be perfect as both a transition shade or an all-over lid shade that would give me just a hint of smokiness (being so close to my skin color).

During my shopping trip to buy Cork, it so happened that the Extra Dimension eyeshadows were launched permanently, and though I don’t love a ton of shimmer in my shadows, I couldn’t help but buy one – iridescent A Natural Flirt reminded me a lot of my favourite shade in my KATE BR-2 palette, and so it was that I brought it home as well.

Finally, I had been eyeing a handful of products from Charlotte Tilbury (who isn’t these days???) and Beautylish offers free shipping on your first order from the site, so along with a Chikuhodo brush (review to come) I picked up a Colour Chameleon eye pencil in Smoky Emerald, a gorgeous dark sparkling khaki, after seeing it in action in a post on Into the Gloss re: makeup for brown-eyed girls. Of all the new shadows I’ve bought, this is the only one I’ve worn (for shame!), and it is LOVELY. Glides on SO creamy and smooth and then lasts all day. And this shade really is PERFECT for brown eyes!

 Left to right: Charlotte Tilbury Color Chameleon in Smoky Emerald, Makeup Geek Pigment in Liquid Gold, MAC Extra Dimension Shadow in A Natural Flirt, MAC Shadow in Naked Lunch, and MAC Shadow in Cork
I also made another shadow purchase, during the Sephora sale: a Giorgio Armani Eye Tint, in the shade 10 Senso (reg. $39CAD). I was so excited to try this formula, and having to order sight-unseen as we don’t have Armani here in Halifax, I took the safe route and ordered the bronzy shade which I was sure would work well for me. When it arrived however, I was dismayed to find that not only was it not all that bronze on me (it looks much more like a taupe-brown with a purple lean), but that it looks very similar to two other shadows I already owned – Laura Mercier Caviar Stick in Amethyst and Urban Decay 24/7 Shadow Pencil in Rehab.

 Left to right: Giorgio Armani Eye Tint in Senso, Urban Decay 24/7 Shadow Pencil in Rehab, Laura Mercier Caviar Stick in Amethyst
Having already purchased more eyeshadows than I should have, and being less than impressed with the shade (and formula – this was nothing to write home about, in my opinion, especially for $39!), I returned Senso. There’s just no room for subpar products or duplicates in my stash!
And so ends my eye makeup purchases – for the time being. I’m sure I’ll buy more mascara at some point, but not until I’ve finished two of these – I’ve tried all the ones on my lemmings list now so I’m good for a while. However, I am going to try my very hardest to resist buying any more eyeshadow until our trip to Los Angeles over the Christmas holiday (can’t wait!!!!), when I’ll have access to a ton of brands we can’t get here (MOAR Charlotte Tilbury!). As you may have seen on my Instagram, I’m struggling with reducing the current collection of shades I own as it is, so until I either can eliminate a few shades or use a few up (!!!!!), I absolutely NEED to put a lid on it for a while.
Now, to leave you with a couple sweet pictures of my wee one, who was such a good girl during my swatchfest 🙂


GAH. My kid is so stupidly cute.
Have you been hauling lately? How do you stop yourself from buying products that you don’t need/don’t use?
My new favourite base combo with Clinique and Benefit
Posted by Latoya in Benefit, Clinique, Foundation, Primer on November 11, 2014
Yikes! It’s been like, two weeks since I last posted…my bad! I find time gets away from me SO easily these days, and it’s not all baby planning. I’ve mentioned before all the extra-curriculars I’ve been partaking in, but (somewhat) happily, one of those has been wrapped up for the time being – my evening French classes have ended and I don’t plan to sign up for any more (I’m still taking lessons during work hours so hopefully that’ll keep me moving forward), so that’s one extra night a week I’ll have to do with as I please. Admittedly, this will probably involve a book and some tea most of the time, ha – I’ve been doing a TON of reading, like it’s going out of style. I just don’t know how much time I’ll have come mid-March (my guess is: ZERO) so I’m getting it all in now.
Nonetheless, rest assured that even if you don’t see me churning out a ton of posts, I’ve still got beauty on the brain! I scored a pretty large haul during the Sephora VIB sale (which I’ll be showing you soon), and I’m employing every trick in the book to really capitalize on the ‘pregnancy glow’ – I don’t really see it myself, but I must be faking doing something right because I’ve been told several times that I’ve got it in spades. Hopefully its being said in a positive way and they’re not referring to me looking like a grease ball ![]() I’m *fairly* certain that’s not the case, as I’ve got a new routine going that I’m really loving! Neither product is new, nor even really new to me, but I started using them together and it’s like a match made in heaven. The duo I’m referring to is Benefit’s The POREfessional and Clinique’s Stay Matte Oil-Free Makeup (in shade 19 Sand).
I’m *fairly* certain that’s not the case, as I’ve got a new routine going that I’m really loving! Neither product is new, nor even really new to me, but I started using them together and it’s like a match made in heaven. The duo I’m referring to is Benefit’s The POREfessional and Clinique’s Stay Matte Oil-Free Makeup (in shade 19 Sand).

I’ve used both of these products on their own separately before, but wasn’t terribly wowed by either. Benefit’s primer seems much like every other, blurring the look of pores with a light, ‘cone-based formula; the Stay Matte formula from Clinique’s foundation range is a great choice for combination to oilier skin that requires little coverage (it’s quite sheer), but it doesn’t keep my skin from getting shiny throughout the day. However, the two together just seem to work. The Benefit primer slightly mattifies my skin (I apply it through the T-zone) and the foundation glides seamlessly on top and manages to leave my skin with only a healthy glow by the end of the day – and this is without applying powder on top!
This has been my go-to pairing for the last month or so – I’m always trying to achieve a ‘glow’ that doesn’t veer into disco-ball shine, and I’ve finally found the trick with these two products. If you’re looking for a completely matte finish, neither of these products, together or separately, will give you that look. But if you have skin like mine that tends to get a low-level shine factor by mid-day, you might want to check them out to keep the oilies at bay without sacrificing that ever-elusive healthy glow.

What’s your favourite primer + foundation combo?
Benefit’s Lollitint: Not just for kids!
The newest offering in their cheek tint franchise, Benefit’s Lollitint caught my eye right from the get-go. When Radiant Orchid was announced as Pantone’s Color of the Year, I hopped aboard that train without looking back, and the Lollitint just seemed like the ubiquitous product, perfect for my newest color scheme.


One caveat: I was SURE it wasn’t going to show up on my darker skin tone. Something about the milky cool pink hue just seemed completely out of my realm and better suited for the more fair-skinned among us. However, early in February, the girls behind the Beauty Envy Bag giveaways got together for a Google Chat, in which my girl Lola informed me that SHE had purchased Lollitint, and it showed up just fine on her gorgeous cocoa complexion. Um, SOLD. I snapped it up the next week 🙂 And true to her word, it worked!

Lollitint is a beautiful orchid hue that gives the skin a pretty flush, perfect for transitioning from chilly winter days to cool, sunny spring ones! It looks somewhat similar on the skin as NARS Desire, but due to the liquid formulation I find it a bit more natural – if you apply it right. My first tries with this product were admittedly HUGE FAILS; dotting it on my cheeks directly with the brush and then blending it out with a duofiber brush (MAC’s #130 in this case) either looked non-existent, or gave me serious clown cheeks. Getting the right balance of product was extremely tough, and as it stains the skin quite quickly, a lot of blush would deposit on one main area of my cheek, looking HIGHLY unnatural. After a few days of this, I was frustrated but determined to persevere.
I finally found the best way to apply the product: I would brush a few swipes of colour across the actual brush head itself, and then quickly blend it in on the cheek in the area I wanted it. This allowed me to diffuse the product around before it had those extra seconds to set, and gave me a truly natural looking pink glow. I’m not generally a fan of fussy products, but in this instance I’ll make an exception, because the finished product is kinda awesome!


Yea, I’m a wee bit in love 🙂 This has been my most-worn blush since picking it up last month, and I see no end in sight at the moment! Once it’s on the cheek, the wear time is unreal – hands down my longest wearing blush EVER. It does wash off fine at the end of the day though, it you were worried about long-term staining. I haven’t worn it on the lips yet however, and I suspect it would probably be 1) an awesome base for pink lippies, and 2) will leave you with a pink pout even after cleansing. I find that lip staining products tend to always be more tenacious.
My love for Radiant Orchid continues! I have purchased shades for lips, cheeks and nails…I’m pretty much set 🙂
Have you tried the Benefit Cheek and Lip Tints before? What are your tricks for applying quickly setting products?
All the Pretty Sparkles: Highlighter Review & Swatches

I often find that my best posts are those that are made up on a whim. Sometimes I’ll be trying something out for my own personal pleasure, and it leads to something else entirely. Today I had one such moment; I was trying to figure out just how I could wear my NARS Laguna Multiple effectively, as its quite pretty but gets very little use. I usually smear it on right from the tube and then blend the heck out of it with my fingers, applying it as a highlight on top of my cheekbones and around my brow bones. Today I tried buffing it in with a stippling brush, which seemed to work exceptionally well. Then I wondered how it looked in sunlight, and stepped out on my balcony in the sunshine, only to be blasted with some serious sparkle! Eeks! I can tell you right now that it is NOT the kind of product you want to wear outside in the sun (so, best used on cloudy days or at night), or at least if you DO wear it, use a very light hand. Lesson learned (and thankfully before I made the faux pas in public)!

Of course, this got me thinking about other highlighters/glow-makers I own and how they fare in the bright sunshine. Of course, being a dutiful blogger, I took photos so we all can benefit from my experiment 🙂 I chose four others that are all permanent products in their respective brands: Benefit Watt’s Up, Becca Shimmering Skin Perfector in Opal, the Balm Mary-Lou Manizer, and Burberry Fresh Glow. You’ve seen swatches of some of these before in my Chanel Poudre Signée post, but here they are again (give or take a couple):

 Left to right: NARS The Multiple in Laguna, Benefit Watt’s Up, Becca Shimmering Skin Perfector in Opal, the Balm Mary-Lou Manizer, and Burberry Fresh Glow
First let me preface the following face swatches by saying that while I could plainly see the sparkle/shimmer in sunlight, it is incredibly hard to capture in photos!! SO frustrating. With that in mind, please take my word for it whether or not something is visible or not, as it is tricky to see in the snaps I took ~grumbles~ Also, please note that all of these shots were taken on completely makeup-free skin (apologies for dark circles!), so there is no other potential shimmer interference (I cleansed my face thoroughly between each shot).
To begin, we have the Laguna Multiple I mentioned originally. Very sparkly in sunlight, and I really would avoid wearing it outside – especially if you do not have my skintone (on me it’s more of a highlight), as it would then be deep bronze + super shimmer, and just wouldn’t be your best moment. You’ll notice as you look through the other face pics that this one has the most noticeable shimmer, even in photographs. BELIEVE IT. However, it IS very pretty and I plan on using it on evenings out over this spring/summer.


Next, we have Benefit’s Watt’s Up luminizer – I only have a sample size of this but honestly that is enough, as a little goes a long way. I want to say it’s my least favorite of the five, but today changed my mind a bit, as the initial BAM! sparkle of it seemed to settle after a couple minutes, and then it really just gave me this lovely radiance. It’s still fairly shimmery, but not as much as the Laguna, and you could probably get away with it in the day if you went very minimal on shimmer elsewhere. Also, I’d probably layer my blush OVER this rather than under (which you’d likely do anyway if you chose powder, as this is a cream, and that’d just get weird), which would tone it down a little bit too. It took me AGES to get photos of this and I’m still not satisfied, so trust me when I say there IS visible shimmer (look for little particle-like things on my face – those are them :P).


Moving right along, next is the insanely popular Becca Shimmering Skin Perfector, in the shade Opal. I snagged this deluxe sample in a swap about a month ago and I LOVE IT SO MUCH YOU GUYS. I’m not going to go on a big ‘You have to buy this!’ rant, because everyone else has done such a good job – so just go buy it already! This product comes very close to the ‘might be too shimmery for day’ line but manages to toe it exceptionally well, so you can totally rock it out all summer long. I adore the glow this gives and because the shimmer particles are so small, they don’t look tacky at all, just nicely done. I will continue to wear this now that the sun is out, day or night.


Continuing on, we come to the Balm’s Mary-Lou Manizer. Next to Laguna this one is the most shimmery, and is also the only powder in the bunch. This was one of my first highlighters (and again, its a small sample size compared to the real deal) and I tended to wear it more in the corners of my eyes than anywhere else. Now, I wear it both ways (on my cheekbones too) but generally keep it to nighttime, as the shimmer combined with the lighter tone and powder formula can make it more obvious than I’d like. Still, the powder is butter-smooth and is nice to have on hand now and again!

 This second shot is kind of bizarro for sure, but it highlighted the shimmers so well I had to include it >_<
Finally, we have the most natural of the bunch, and my personal preference for a foolproof glow – Burberry’s Fresh Glow Luminizing Base. If you recall, I bought this last year as a birthday treat for myself (which I think I might do every year – buy Burberry makeup, I mean!) and was unsure if it was genius or useless. Well, consider me converted because this give the most subtle yet glowing look of the bunch. It can be worn a multitude of ways: on bare skin, under foundation, over foundation, mixed in with foundation, etc. – but I prefer to use either on a bare face to just give me a pick me up if I’m going super low-key, or on top of foundation on the high points of the face. Even though there is shimmer, somehow there is no shimmer – like Houdini or something. I haven’t quite figured it out, but I will say that looking at it worn in full sunshine today for the first time, I was totally amazed – I looked utterly radiant but like I had absolutely nothing on. Kind of like how you look when you put on a face oil, and you look glowing, but without the adding ‘shine’ factor. Good times. Dammit Burberry, why is everything you do SO DAMN EXPENSIVE GOOD?


Thus concludes my research – I hope you found it helpful! I know it’s tough to see the nuances between shots but I think the gist is there in terms of comparing the five. As always, this kind of post is helpful for me too, so yay for killing two birds with one stone!

Do you wear a highlighter? What formula/finish do you prefer? Which of these ones would you choose?
How Convenient That Pantone’s Color of the Year Was Also PERFECT for St. Patty’s Day!
Posted by Latoya in a-england, Blush, Chanel, Eye Liner, MAC, Make Up For Ever, Make-up, Urban Decay on March 18, 2013
So. Yesterday was St. Patrick’s Day! 7 years ago (OMG how time flies…barf) I was in Dublin for Paddy’s Day (as they shorthand it in Ireland), and yea…it was as crazy as you’d imagine it to be! Not so much a drunken mess, but just the sheer amount of people…yowza. It was a fantabulous time, and I’ll never forget it!
As the years pass, it seems the crew of hardcore Paddy’s Day party-goers dwindles in my crowd – job responsibilities, babies, and aging in general all seem to keep everyone at home on one of the most fun days of the year ~tear~ Thankfully, I have an excellent partner-in-crime who I can always count on to celebrate with me! This year it was just the two of us, so it was more low-key than usual, but I still made sure to dress the part – which includes green makeup (and nails), of course!


I usually do a lot more green on the eye, but since it wasn’t a rip-roaring party I went subdued and just wore a simple flash of green liner on the top lash line. I used Urban Decay’s 24/7 Liner in Covet (an emerald green with silver microglitter) on top of MAC’s Blacktrack Fluidline – the black gave the green more depth and helped the line look more crisp. I added MAC All That Glitters shadow all over the lid, as I find it gives the most beautiful shine to the eye without ever seeming like too much, and then a dab of Giorgio Armani’s Eyes to Kill shadow in #6 Khaki Pulse to the crease to add a little bit more depth. *Side note – anyone notice that I’m trying to grow my eyebrows out? It’s so frickin’ hard dude! I want to pluck all the random stray hairs but I’m trying to be patient ~sigh~ They are coming along though 🙂

Since it was going to be a long day, I wore MUFE’s HD Blush in #12 First Kiss on bare cheeks, layered foundation on top, and then added a touch of MAC’s Mineralize Blush in Early Morning to make sure my blush had good staying power. I quite liked the way it made my skin look kind of lit from within. I don’t usually layer cream and powder blushers but I really need to get on that! I topped off my cheekbones and other high points of the face with MAC’s Beauty Powder in Shell Pearl, which gives the best glow – I finally got my hands on the Year of the Snake version last week and I LOVE this product. Review will be forthcoming!

I finished with a very simple lip using Benefit’s Ultra Plush gloss in Hoola. I didn’t want anything competing with the green liner, so this gave the barest hint of shimmer and warmth, but that’s about it.

Of course, the look isn’t finished – gotta get some flash on the nails too, right!? Because I’m not a fan of green nail polish as a whole, I don’t actually own any that are going to give me serious pizazz. But I have shades with a green tinge… haha. I made it work, I think! I just read about sideways manicures, so I tried it out – easiest nail art EVER. And also my new favorite!!


The shades I used were a-England Tess d’Urbervilles as a base, and Chanel Peridot on top. This was probably more subtle than I should have gone with – the nature of Peridot with it’s duochrome nature just makes the a-England shade look like a shadow. Nonetheless, I loved the effect, and loved how darn easy this one (no nail stickers required – freehand works perfectly!), so I’ll definitely be trying this again and again with other shades. Fun!
I always have intentions to get these kinds of event posts up before the actual event, but who am I kidding? That’s never going to happen – I’m too busy prepping for the occasion to actually have time to post! LOL Anyway, all the other bloggers have got this covered for me 😀 And it’s not like I did anything particularly unique, and both the makeup and nails could be done any time of the year, right?
How did you celebrate Paddy’s Day?? Did you do any themed makeup and/or nails?
Beat the Winter Blues – Enter to Win Our Winter Edition Beauty Envy Bag!!
Posted by Latoya in Benefit, butter London, Eyeshadow, Giveaway, Hand Care, L'Occitane, Lips, Nail Polish, Tarina Tarantino on January 15, 2013

We’re back with the Winter Edition of the Beauty Envy Bag! We’ve handpicked several of our beauty
favorites that will help you make it through this winter season with some new goodies. The bag consists
of all full-sized products to help meet your beauty needs. For those of you who may be new to our blogs,
here’s a quick introduction.
 Lakeisha is a nail polish blogger from Florida. She is obsessed with polish, fashion, and merging the two together. She is the blogger behind Refined and Polished.
 Latoya is a beauty blogger from the East Coast of Canada. While she loves all things girly, she’s also a closet gamer and is a die-hard Walking Dead fan. She is the blogger behind Beauty Obsessed.
 Leticia is a beauty blogger from the Pacific Northwest. She is a dog lover, sci fi nerd, handbag collector, and makeup junkie. She is the blogger behind Cosmetics Aficionado.
 Lola is a Midwest blogger with a passion for polish, science, and music. She is the blogger behind Burb Beauty.
The Winter Edition of the Beauty Envy Bag contains:
- L’Occitane Hand Indulgence Hand Cream Set (Reviewed by Lola)
- Benefit’s High Flyin’ Glosses Collection (Reviewed by Latoya)
- Tarina Tarantino Emerald Pretty Eyeshadow Palette (Reviewed by Leticia)
- Butter LONDON Two Fingered Salute & Scallywag (Reviewed by Lakeisha)
Please feel free to click the links above to learn more about each product. Accompanying all of the items
is a purple metallic beauty bag from Sephora and additional samples will be included as well.
Here is what you need to know to enter in the Rafflecopter widget below:
- Must leave a blog comment (just one blog, doesn’t have to be all four) letting us know your
favorite winter beauty product. - Additional entries for following each blog on social media networks (Facebook, Twitter,
Instagram) - Open internationally
- Must be 18+
- Giveaway closes on Monday, January 28, 2012 at 11:59 EST
Good luck dolls!!!
Indulging My Inner Consumer with Benefit’s High Flyin’ Glosses Collection
Back in November, having missed out on buying cosmetics for so long, I did damage control by picking up Benefit’s High Flyin’ Glosses set, a collection of six mini Ultra Plush lipglosses that gave me a good bang for my buck ($28CAD for a $52CAD value) and a fistful of new shades to get me back into the game in a (semi) big way. Since I’ve been terribly delinquent in filling you in on these glosses, I’ve had lots of time to review them in full and can give a fairly clear picture of the product. Let’s begin, shall we?

Each of the glosses in the set are 6.5mL (full-size are 15mL), and the colors correspond with each one of Benefit’s boxed blushes/bronzers (except Hervana): CORALista, Bella Bamba, Sugarbomb, Dandelion, Dallas, and Hoola.
 Left to right (sunlight): Sugarbomb, Dandelion, Hoola, Dallas, CORALista, Bella Bamba
These first three glosses have shimmer and give a nice sparkle to the lips:
Sugarbomb is a cool-toned mauvey-pink with shimmer – it has the most shimmer of all six glosses. The gloss is sheer in pigment and merely lightens my lips very slightly and adds a very wearable sparkle.


Dandelion is a pale pink shimmered gloss that looks very similar to Sugarbomb on the lips, but with less shimmer. It is also quite sheer and very natural-looking except for a slight pearlized effect.


Hoola is a sheer golden bronze shade with a hint of shimmer and nearly translucent on the lips. Strangely, this shade is one of my favorite shades of the collection!


The second group of glosses do not have any shimmer:
Dallas is a rosy nude shade that has the most opacity of all six colors. It can be a bit tricky to apply evenly and I found it collected a bit in spots if I didn’t apply it carefully.


CORALista is, as the name implies, a coral shade that leans more orange than pink. It’s quite sheer and imparts only a hint of color to the lips – which should make the hue very wearable for all skintones.


Bella Bamba is a deep pink gloss that doesn’t lean warm nor cool. It is also very sheer once applied and while it does give the lips some color, it is subtle. Someone with less pigmented lips may get a more noticeable effect that myself (my lips are of medium pigment).


Overall, I quite like these glosses – all are wearable across skintones, and feel nicely hydrating on the lips. I also like the fact that the shine isn’t glass-like, which is a turn off for me – it’s somewhat more subtle and therefore great for someone who doesn’t generally like glosses, or who usually prefers lipstick. They do have a fair bit of slip so they only get a few hours of wear at most, but I don’t mind. As they don’t give a vast amount of difference in tone when worn, I wouldn’t suggest picking up each shade on their own – my recommendations would be to choose either Sugarbomb OR Dandelion, Hoola, Dallas, and CORALista OR Bella Bamba depending on your preference in color. However, owning the set of these minis is ideal as they are fun and terribly easy to carry around with you day or night.

Though the High Flyin’ Glosses set is no longer available, you can get the full-sized glosses for $18CAD, OR opt for one of their great kits that contain mini sizes of the gloss and their corresponding powder blush, along with a cheek tint and one of their highlighters in complimentary tones (available for Dandelion, CORALista, and Sugarbomb, for $32CAD at Sephora).
…OR stay tuned for a possible li’l surprize coming later this month 🙂
Did you pick up this set, or any of the Benefit Ultra Plush glosses? Are you a gloss wearer or all about lipstick?
Upcoming on Beauty Obsessed…
Posted by Latoya in Benefit, Holiday 2012, Hourglass, Illamasqua, Make Up For Ever, Make-up on November 19, 2012
So it’s been a week since I’ve been returned from my New Zealand adventure, and I’m slowly (verrrrrry slowly) getting back into the swing of things. It’s quite an adjustment to go from an action-packed-always-on-the-go-surrounded-by-people-partying-every-night atmosphere, to being…back to work, home alone, same-old same-old. I’m not knocking my life by any means – I’ve got a warm, cozy condo; a good (though perhaps boring) job; and great friends – but it’s still quite a change to get re-established into. And I’m someone who really likes to have things to look forward to (which is why I’m planning my next adventure!).
 When I googled this country, I noticed it ALSO has a lot of sheep…guess it’s my thing 😉 *Hint hint*
ANYWAY. Enough whining, and on with the show, right? Right. Tonight, I opted get a bunch of ‘To Do’s’ done and make bread (because what’s more comforting than baking bread!?), but I want to show you what you can expect to see on the blog in the next week or two. I happily came home to a few surprise packages that had been sent my way, so despite the fact that I haven’t been buying much in the way of exciting cosmetics in the past couple months (though…I did pick up an eyeshadow this weekend ~guilty face~), I do have several holiday sets – four to be exact – to fill you in on!
Illamasqua Lip Twin Set*
 Intense Lipgloss in Plentiful & Lipstick in Obey
Hourglass Best of Hourglass Collection*
 (Top to Bottom): Veil Mineral Primer, Film Noir Full Spectrum Mascara, Extreme Sheen High Shine Lip Gloss in Ignite, No. 28 Primer Serum
Make Up For Ever All Eyes On You Set*
 (Clockwise from left): HD High Definition Powder, Aqua Cream Waterproof Cream Color in #16 (Pink Beige), Smoky Lash Extra Black Mascara, Aqua Eyes Waterproof Eyeliner Pencils in 21L (dark grey) and 0L (mat black)
Benefit High Flyin’ Glosses Lip Gloss Set
 (Clockwise from top left): Coralista, Dallas, Bella Bamba, Dandelion, Sugarbomb, Hoola
I think that’s a pretty good start to the holidays, don’t you? I will tell you now, I am absolutely IN LOVE with the Hourglass No. 28 Primer Serum – it makes my skin look amazing on it’s own, improves it’s texture, doesn’t cause ANY breakouts or irritation (even on my normal-to-oily skin), and my makeup wears better and smoother with it on (though I will say, it doesn’t make it last all day long). I’m definitely buying a full-size when money isn’t so tight!
So – keep your eyes peeled! I spent the morning Sunday taking photos of everything, though I have to redo my lipgloss swatches as I had a bit of unnoticed flaking going on – yikes! I don’t want to scare you away just when I’ve gotten back! 🙂 Also…..one (or even two!) of these sets just *might* be part of a giveaway coming soon to a blog near you – just sayin’.
What’s on everyone’s wish list for the holiday season, cosmetics-wise? Anything you’ve already picked up and are loving?
*Products marked with an * were provided to me for consideration of review by the PR company/brand.
FOTD Trial and Errors!
Posted by Latoya in Benefit, Chanel, FOTD, Hourglass, Make Up For Ever, Make-up, NARS, theBalm, Urban Decay on February 29, 2012
Happy Hump Day everyone!! Heyyy, February is pretty much over – doesn’t that make you feel like Spring is REALLY on it’s way? Even though it doesn’t officially start for another three weeks or so, I always feel like March marks the end of Winter and the beginning of good (re: warm) things 🙂
For the past week, since Lent began, I have been steadfastly putting in an effort to take FOTD shots of my makeup looks every day, but unfortunately for all of us – I have been failing spectacularly. I just can’t seem to get it right, and it’s frustrating me to no end. However, fortunately for everyone, I don’t give up easy, and I am going to keep on trying until I am successful! Embarrassingly, here are some of the shots I’ve taken over the past week:

") MUFE Aqua Liner #14 with the purple shade of NARS Habarnera in the crease and along the lower lash line. I swear in person the shadow was actually noticeable, more than just the hint of shimmer showing here!
MUFE Aqua Liner #14 with the purple shade of NARS Habarnera in the crease and along the lower lash line. I swear in person the shadow was actually noticeable, more than just the hint of shimmer showing here!
")
")
 This was my getaway look this past weekend – Urban Decay’s Bourbon liner on the upper and lower lashes, Benefit’s Bella Bamba on cheeks, and MUFE’s Star Collection Lab Shine in S4.
 I snuck this photo at work while in fear of someone finding me taking pictures of myself lol – I’m wearing Urban Decay’s Bordello eyeshadow (from the BoSIII palette), with UD’s Smog in the crease, theBalm Down Boy blush, and MUFE Lab Shine S4 again.
Tonight, I managed to get a couple shots I was fairly happy with, though I still wish I could get close-ups of eye makeup so that you can see what I’ve done. But – beggers can’t be chosers, I guess! Below, I’m not wearing too much – just a touch of the pale shade of Hourglass’ Exhibition shadow duo on the lid, UD’s Crash liner, Benefit’s Bella Bamba on cheeks, and the star of the look – Chanel’s Rouge Allure Laque in Empire.")

")
 My goal with all of these FOTD shots are to showcase the products that I haven’t been giving enough love to, and figuring out how to make them work on a regular basis. Chanel’s Empire perplexed me from the start – it was such a gorgeous shade, but I just didn’t see it working on my skintone. However, now that I’m easing into wearing pretty Spring hues, I find this lippie works PERFECTLY. It’s just not a Fall/Winter shade on me, AT ALL. Now that I’ve figured that out, I’m gonna have some serious fun with this color!! It’s absolutely perfect for pretty much any Spring look I’ll be wearing.
What makes me cringe chuckle when I go back through these pictures, is that my makeup looks almost identical in each – this is one of the frustrating parts, because each look was different, honest! ~sigh~ Anyway, as I said, I’m going to continue to press on, and *one day* I’ll get it. At the very least, I’m having a great time wearing different products every day and giving all the neglected items I own a little attention. Talk about shopping your own stash! 😀
Have you rediscovered a product that you weren’t sure about, only to find that you’ve changed your mind and have now fallen in love?
Review: Benefit They’re Real! Mascara
Soo…I’m totally a sheep (Eh? Does that sound weird to you? What’s the singular of sheep? Strange…). I doggedly follow various blogs online, reading all about the newest and best cosmetics out there, and then – I go get ‘em! More often than not I base my purchases according to the reviews I read, and discard those products which sound subpar. I trust my fellow beauty bloggers to steer me in the right direction, and usually they’re right on the money. At least, with the items they rate well. It’s rare that I’ll still forge ahead and grab something that meets a generally unfavorable consensus, because I just don’t want to waste my money and chance hating it too. This behavior, while reasonable, makes me a sheep. Sometimes I’m OK with that, other times I feel like I need to be more of a pioneer…but I think I’d need to be making a lot more money for that 😛
Anyway, to the point! I saw online several reviews for Benefit’s new mascara, They’re Real!, and despite the eagerness which people seemed to be buying this product, it was getting somewhat mediocre reviews. It sounded O.K., and looked decent, but certainly nothing to write home about. Those products, I usually skip. But in the excitement of the moment, during the Sephora opening earlier this month, I scooped it up on a whim.
")
")

Now, of course, the day I bought it I then went camping for a week +, so I did not get a chance to test this baby out. As soon as I returned however, it was game on. And in the end, I wasn’t disappointed!")

")
This mascara is up there with some of my faves. After going through a slew of mascaras that just didn’t do it for me in any capacity, it seems my luck has turned lately – first with G.A.’s ‘Eyes to Kill’ and now with Benefit’s new offering. Jet-black and long-wearing, ‘They’re Real!’ claims to lengthen, curl, volumize, lift, AND separate, and offers a specially designed brush to reveal “lashes you never knew you had!”. So, basically it does it all. Now, let’s get ‘real’ for a minute. While I love this mascara, it’s no superhero. All mascaras lengthen and volumize to some degree – it’s pretty much impossible to coat your lashes in product and miss the boat there. So, point by point, let me rate the actual abilities of this product:
Lengthening: I’d give it an 8/10. It does make my shorter lashes look noticeably longer, but by no means do I look like I have fake eyelashes on (which I think is the claim they’re subtly trying to convey with the title ‘They’re Real!’).
Volumizing: A disclaimer – when I think ‘volume’ in reference to lashes, I think actual density of lashes, as in, you look like you have a million lush lash hairs and create a breeze when you bat an eye. I do not think that volume means the thickness of each lash hair, because to me that seems like a silly goal to have – why would you want to look like each hair is really fat? I know the ‘spider’ mascara look is back this season, but it’s never been my preference and I can’t imagine that that is what the companies mean by ‘volume.’ But what do I know?
Anyway, in this regard, I can only give ‘They’re Real!’ a 6/10. I already have somewhat voluminous lashes so take that info as you will, but I could definitely use more thickness, and this doesn’t really do the trick. I always find it sort of contradictory for a mascara to claim that it volumizes AND separates – personally I think it can only do one or the other. Which leads me to…
Separation: Here is where this mascara takes top marks – 9/10. While it may not pump up the lashes as it claims, it does separate well and makes the lashes really stand out, which in turn makes my eyes the focus of attention very easily. As is typical for rubberized brushes like this one, because the bristles are stiff, they can glide through the lashes and help minimize clumping. Normally, I dislike these kinds of brushes; even though they do the job well, I always feel like I’m jabbing my lash lines and it feels uncomfortable. For whatever reason, this brush doesn’t do that – and it’s just as stiff as any other. Whatever, I’m OK with it.
Curling: Sorry dudes, I can never accurately rate this feature because – like my hair – my lashes are already majorly curly so I’d never know if this was doing the job or not. No comment.
Lifting: Isn’t this the same as curling? I guess this lifting claim is supposed to be due to the formulation, which holds well throughout the day and keeps lashes in check. Again, I can’t really rate this as my lashes are always perky, but I can say the formula is excellent in terms of wear – no smudging or flaking the entire day. It takes a bit more work to get off in the evenings (as compared to Clinique’s, for example), but nothing that your normal makeup remover can’t take off.
So, as you can see from my (incomplete) review, this mascara has mostly strong features, and is a good option if you’re looking to lengthen and separate lashes. You probably could find something comparable at a drugstore price – this isn’t cheap at $29CDN – but then again, I didn’t have much luck going that route so it’s hard to say. I hadn’t read how to apply the product, but after looking at the description on Benefit’s website, I’m intrigued by the suggestion to “fan the corner lashes outward with the custom-domed tip” to achieve a “big, doe-eyed look.” Something I’ll have to try!
Which mascaras have you tried and loved/hated? What features are you most concerned with when choosing a mascara? Are you willing to pay more if the product does what it claims?
Hump Day everyone! I hope you’re all making it through OK 🙂
Thanks for reading!


Must Reads
SERIES
BEST BANG FOR YOUR BUCK

MY COLLECTIONS

SUMMER POLISH COMBOS

