Archive for category Primer
Recent Purchases, Part V: The base/face prodz
Posted by Latoya in Blush, Bronzer, Concealer, CoverFX, Foundation, Laura Mercier, MAC, Make-up, Maybelline, Powder, Primer on August 11, 2015

We’re almost done with these posts folks, I promise; there’s only one more after this (and I’m hoping to make it really extra special!). Today we’re looking at the base products I’ve accumulated over the past few months, plus a blush I picked up because, ya know: PRETTY.

Probably my favourite acquisition out of the bunch is MAC Mineralize Skinfinish Natural in Medium Tan ($37CAD). I am SURE I’ve tried this stuff before, but I don’t remember liking it so much! Even though I’m all about that #dewyskinlife, I kept seeing how lovely this looked on Karen and thinking I should really give it another shot. Guys, if you haven’t tried this, this ain’t your regular flat matte powder! Especially on top of well-moisturized skin, this powder makes my skin GLOW without heading into greaseball territory, which you know can be difficult to achieve with oilier skin (like mine). What I especially appreciate is that I can actually layer skincare products (serum & sunscreen in the summer) as well as use a primer if I’m so inclined (see next item) prior to using this, and my skin doesn’t feel sticky with product and my base doesn’t slide off in the warmer weather – which always happens when I use a liquid foundation over more than say, one other product. Applied with the Real Techniques Buffing Brush I purchased, I don’t get that matte, dull look from this either – it really doesn’t look like powder, just like my skin is naturally great and healthy-looking. I think I’ve found my HG summer foundation!
Wearing the MAC Mineralize Skinfinish on top of the Laura Mercier primer, along with MAC’s Peony Petal blush and the MAC Orange Corrector/Maybelline Neutralizer combo under eyes – and the Lancome lippie of course!
In keeping with my constant quest for glowing skin, I picked up a travel size of Laura Mercier Foundation Primer – Radiance ($25CAD) shortly after Elena was born (I think it was our first trip to the mall together lol) because I desperately needed something to give my clearly overtired face a boost. Described as a ‘lightweight, water-based gel’ (except it contains castor seed and jojoba seed oil??? Calling it water-based implies it’s oil-free, but it’s not…sort of misleading, eh?), it’s supposed to ‘provide a sheer, healthy glow to skin while prepping skin for makeup’. The shade is fairly neutral, not warm nor cool, and ‘blurs imperfections and improves makeup wear’. So ok. This kind of product I normally wouldn’t go for because to me it’s just asking for trouble (aka shine) when you use a non-mattifying primer on oilier skin like mine. But in my baby-adled brain it made sense at the time, and happily it hasn’t been a decision I regret. It just requires me to use it in a certain way. I started off using this by combining it with my liquid foundation for that all-over-glow, but it’s a bit much and ends up making me look – not greasy, exactly, but sort of unkempt somehow? I dunno, all I know is that by the end of the day I’m like ‘Yikes, Latoya!’ However, if I use it strategically before foundation on my cheekbones, down the centre of my nose, and over and under my brow bones (AKA – step one of STROBING [so funny how highlighting has a ‘technical’ name now]), it gives a lovely ethereal look to the skin – a bit more subtle than straight highlight. Interestingly, I’ve read reviews that say this is really sparkly; as a person who doesn’t much care for sparkle on the face except for on eyes, I haven’t actually found that to be the case, so not sure what’s the deal there.
Anyway, I do like this, but I’m glad I just have the travel size, as I’d like to try the CoverFX Illuminating Primer next.

When Elena was still in the hospital, I put in an online order for MAC because, well, essentially I think I was losing my mind in there and needed something to boost me up lol. I got it in my head that I *needed* a purplish blush, but they’re quite hard to find (this was before Urban Decay released their new blushes – I’m still curious about Bittersweet). MAC Satin Blush in Peony Petal ($26CAD) looked like the closest I was gonna get to a purple-hued blush – it’s actually a bright blue pink, but it’s super-cool tones appealed to me – so into the online cart it went.
This was also a purchase I didn’t regret – more and more I find cool-toned makeup quite flattering on me, and this is no exception. In the winter months it gave me a beautiful chilly flush, and now in the summer it adds a very subtle hint of color that is hard to overdo (which is good as I am still more heavy-handed with blush than is probably good). Loving it!
 MAC Peony Petal Satin Blush
Also in that order, I picked up MAC Studio Finish Skin Corrector in Orange ($15.50CAD) because I was desperate to find something to help with my dark circles, which were looking even worse than normal. This product is INTENSE guys, and you should NOT apply it straight from the pan and think your problems will be solved (no hate, but I watched this tutorial and it was what made me think I needed this concealer…I dunno how she made it work, but it is NOT that easy). I tried it and promptly put it to the back of my makeup drawer, thinking I just wasted $16.
However, I got reinvigorated to try it this week while writing this post, and I found some better advice that suggested mixing this with a yellow-toned concealer to create a ‘corrector’ shade, much like Bobbi Brown’s or the like. I just so happened to have a product like that (see Maybelline Neutralizer, below) so I applied the yellow-toned concealer first, then added the smallest dab of the orange and blended together for an awesome eye-brightening look! I’m actually super-pleased with the effect and I’m happy that I didn’t give up entirely – the results are well worth giving the Corrector a second chance.
 Left to right: MAC Corrector in Orange, Maybelline Treatment Concealer in Neutralizer, the two mixed
Earlier in the year, before I had Elena but during the later part of my pregnancy in which I was experiencing some insomnia, I was on the hunt for something, anything to help with my dark circles (can you send a recurring theme here?!). After picking up Tarte’s Amazonian Clay Creaseless Concealer, I decided I needed a brightening powder to set it with, and came home with Laura Mercier Secret Brightening Powder ($29CAD). Truth be told, I don’t use it that much – I just don’t find it to be so brightening, and to use a separate setting powder just for under eyes is just more effort than I’m willing to put in. If this were a miracle product, I’d happily do so, but I honestly don’t find it does much of anything. Ah well.

The CoverFX Custom Color Drops in N60 ($44CAD) have been a polarizing product that has had many reviews for and against it. I’m not going to waste MORE words doing a full-on review because others have done it better, but my two cents is that it’s handy for adding to other skincare products without losing too much potency and coverage (like you would if you added your regular foundation to say, a moisturizer), which is ultimately what I bought it for. As mentioned, I don’t like layering too many products on my face in the summertime, so this is ideal to mix with my current SPF60 sunscreen – I get the coverage of a foundation (I only use a couple drops so it’s about a light-medium coverage, which is my preference), but since my SPF is higher I don’t feel my sun protection is compromised too much. Some people have also found the foundation lightened up too much when mixed – I bought mine online and had to guess at the shade, which is a bit dark on it’s own but perfect when mixed, so I lucked out! Win-win-win for me!
 CoverFX Custom Color Drops in N60
I grabbed Maybelline Instant Age Rewind Eraser Dark Circles Treatment Concealer in Neutralizer on a whim when it was on sale while I was still in my ‘BANISH THE DARK CIRCLES‘ phase (not that I’m every really OUT of that phase…I just get to a point where I have TOO many products that I can’t justify even ONE more). They didn’t seem to have a dark enough shade for me so I figured the Neutralizer was the safe way to go. Alone, this is SUPER light on me – like Kim K. reverse racoon-eyes light [note though that I used this on all the girls during a wedding makeup I did last weekend and it was perfect for concealing any darkness on them (they were all fair-skinned)]. But as mentioned, mixed with the MAC Orange Corrector, this works kind of awesome to brighten my under eye.

Finally, just a quick mention of the Marc Jacobs O!Mega Bronze Perfect Tan ($59CAD) that I bought and later returned during the Sephora sale. It was a fabulous shade, but for my darker skin it was just not enough. However, if you’re lighter than me I definitely recommend checking this one out – it wasn’t too orange nor too brown, and the powder was silky smooth and lovely. Below are a few swatches of it against other bronzer shades I own for comparison purposes.

 Left to right: MUFE Pro Sculpting Powder Duo #2 Golden (contour shade), Too Faced Sun Bunny Bronzing Powder, Marc Jacobs O!Mega Bronze Perfect Tan
That seemed like a long-winded post for only a handful of products! Sheesh. I can’t keep my trap shut lol. Anyway, I feel slightly overloaded with base products right now, but as they’re something I use every day I don’t worry too much about using them up. That being said, I am on a base-product-hiatus for the time being!

Do you own any of these products? What kind of skin finish do you prefer: dewy, satin or matte??
Saving face (literally) with products from Make Up For Ever
Posted by Latoya in Bronzer, Contour, Highlighters, Make Up For Ever, Make-up, Primer, Sephora, Spring 2015 on April 21, 2015
Remember my post about the key makeup prodz for new moms? The implied message was that all you needed was some concealer, bronzer and a subtle lip color and you’re good to go. HA. And another HA I say. While there may only be TIME to apply 3 products, the reality (for me anyway) is that you look so haggard from lack of sleep, and a bit janky from hormone-induced breakouts, that you need a wee bit more than that to look ‘normal.’ Though my skin hasn’t gone completely bat-shit crazy like it did after the miscarriage, I’ve had a few spots crop up that really reflect just how little I’m able to dedicate to self-care these days (my feet, you guys – OMG they are so dry and ragged that putting on socks is like scratching nails down a chalk board!). On top of that, I’m a little – nay, A LOT – sleep-deprived, which does nobody’s skin any favours.
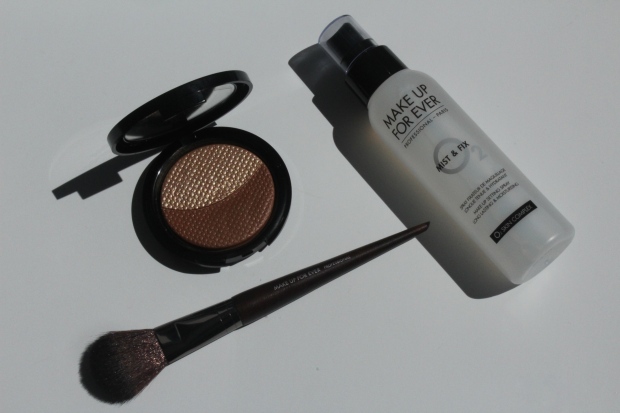
Fact is, I need a little extra help in the makeup department lately. Fortuitously, 2 products have recently crossed my path that have helped do a little ‘damage control’ – Make Up For Ever’s Pro Sculpting Duo in 2 Golden ($45CAD) and their Mist & Fix setting spray ($34CAD).

As contouring has suddenly gone from being an optional step (and viewed somewhat derisively at times), to the current ‘BIG THING’ in makeup, it’s no surprise to see a true makeup artistry brand like Make Up For Ever join the ranks with their own vision of what a contour product should look like. Conveniently including both a contour shade as well as a highlight in the compact (which comes in two shades – 2 Golden for medium-deep to deep skintones, shown below with their 156 Large Flat Blush Brush [$43CAD] ideal for just this purpose; and the lighter 1 Pink Beige for fair to medium skintones), the weightless gel-powder is designed to ‘blends seamlessly for traceless highlighting and contouring.’


I was very excited to try this product, not only to try my hand at contouring (something I’ve never really done), but also because – HELLO, that powder looks beautiful! However, when I dug into the product, I was a bit disappointed, and I’m sure those of you who ‘know’ about contouring can guess why.
The color of the darker powder is too warm to be used as a contour (in my opinion). I tried it, and while it applies soft and subtle – a must, as contouring is supposed to be undetectable – it mostly looks like I used bronzer to sculpt my face, and not like I naturally have covetable cheekbones. To be fair, people have been using bronzer as a contouring product for ages, but I just feel like it should be marketed as such, you know? Nonetheless, it does make for a lovely bronzer, which is how I’ve been wearing and enjoying it.
The highlight shade, on the other hand, is as it should be, and imparts a lovely glow to the high planes of the face. Its a *touch* more frosty than I usually like my highlighting products, but not so much that I haven’t been wearing it often. It’s a particularly flattering warm golden shade on my skin – I just might not use it during the height of the summer sun.

Both powders are very smooth with an almost creamy feel, and though I sometimes feel like I need several passes to pick up enough product, this keeps one from overdo-ing either one, an easy mistake to make with these types of products. Overall, though this wasn’t exactly what I expected, I quite like it and have been wearing it frequently to give my skin that extra ‘oomph’ I so desperately need.
After bringing life back to my skin with the Sculpting Duo, the pièce de résistance is the brand’s Mist & Fix setting spray, which helps ‘lock in makeup and keep color fresh.’ I was really pleased to try this product, as I had been contemplating buying MAC’s Fix+ – I really wanted something to set my makeup and give me a bit of a dewy sheen so my makeup would look more natural. I didn’t even realize Make Up For Ever made a similar product (though I should have known!), and all the better that they do!

The spray is designed to create a ‘sweat-proof, rub-resistant barrier for fresh-looking makeup that lasts up to 12 hours.’ It also helps to increase skin’s hydration and is ‘formulated with a complex to boost oxygenation and deliver a healthy-looking, radiant glow.’ I can’t speak to the 12 hour claim (when I DO wear makeup these days, it’s only for a few hours) nor the oxygenation part (uh, sure?), but I can attest to the awesome glow this gives the skin – that kind of dewy radiance that I’ve been trying to achieve for so long is finally in my grasp! SO happy. The only beef I have with the product is the scent – kind of reminds me of bug spray or something? Not that strong, but it’s a sort of mildly unpleasant chemical smell which is a touch off-putting. But, it does dissipate and doesn’t linger on the skin, so I can live with it. Also, hooray for spray nozzles that work properly (huge pet peeve of….probably everyone, AMIRITE?!) – this mists nice and evenly on the skin.

So there you have it – two additional secret weapons I’ve been using to look like an upstanding citizen again. I feel like the days when I venture out of the house has me wearing more products than ever before! At least, the basics…I wear less fun color and more stuff to make the skin itself look better. Ah well, it’s all only temporary…and things change so quickly! Just within the past week Elena has started sleeping for longer stretches at a time (she’s also awake for a bit longer) and more deeply…which means mama gets more sleep too 😉 I might be back to wearing bold lippies and fun eyeshadows sooner than I thought!
Do you use bronzer to contour, or a product designated for that purpose? Have you ever used a setting spray? What tricks do you have for looking well-rested?
*Products were provided by the PR company/brand for my unbiased consideration.
My new favourite base combo with Clinique and Benefit
Posted by Latoya in Benefit, Clinique, Foundation, Primer on November 11, 2014
Yikes! It’s been like, two weeks since I last posted…my bad! I find time gets away from me SO easily these days, and it’s not all baby planning. I’ve mentioned before all the extra-curriculars I’ve been partaking in, but (somewhat) happily, one of those has been wrapped up for the time being – my evening French classes have ended and I don’t plan to sign up for any more (I’m still taking lessons during work hours so hopefully that’ll keep me moving forward), so that’s one extra night a week I’ll have to do with as I please. Admittedly, this will probably involve a book and some tea most of the time, ha – I’ve been doing a TON of reading, like it’s going out of style. I just don’t know how much time I’ll have come mid-March (my guess is: ZERO) so I’m getting it all in now.
Nonetheless, rest assured that even if you don’t see me churning out a ton of posts, I’ve still got beauty on the brain! I scored a pretty large haul during the Sephora VIB sale (which I’ll be showing you soon), and I’m employing every trick in the book to really capitalize on the ‘pregnancy glow’ – I don’t really see it myself, but I must be faking doing something right because I’ve been told several times that I’ve got it in spades. Hopefully its being said in a positive way and they’re not referring to me looking like a grease ball ![]() I’m *fairly* certain that’s not the case, as I’ve got a new routine going that I’m really loving! Neither product is new, nor even really new to me, but I started using them together and it’s like a match made in heaven. The duo I’m referring to is Benefit’s The POREfessional and Clinique’s Stay Matte Oil-Free Makeup (in shade 19 Sand).
I’m *fairly* certain that’s not the case, as I’ve got a new routine going that I’m really loving! Neither product is new, nor even really new to me, but I started using them together and it’s like a match made in heaven. The duo I’m referring to is Benefit’s The POREfessional and Clinique’s Stay Matte Oil-Free Makeup (in shade 19 Sand).

I’ve used both of these products on their own separately before, but wasn’t terribly wowed by either. Benefit’s primer seems much like every other, blurring the look of pores with a light, ‘cone-based formula; the Stay Matte formula from Clinique’s foundation range is a great choice for combination to oilier skin that requires little coverage (it’s quite sheer), but it doesn’t keep my skin from getting shiny throughout the day. However, the two together just seem to work. The Benefit primer slightly mattifies my skin (I apply it through the T-zone) and the foundation glides seamlessly on top and manages to leave my skin with only a healthy glow by the end of the day – and this is without applying powder on top!
This has been my go-to pairing for the last month or so – I’m always trying to achieve a ‘glow’ that doesn’t veer into disco-ball shine, and I’ve finally found the trick with these two products. If you’re looking for a completely matte finish, neither of these products, together or separately, will give you that look. But if you have skin like mine that tends to get a low-level shine factor by mid-day, you might want to check them out to keep the oilies at bay without sacrificing that ever-elusive healthy glow.

What’s your favourite primer + foundation combo?
Arm yourself for cooler weather with Korres skincare
I don’t know about everywhere else, but for the past few weeks it’s definitely felt like fall here in Hali (but at least it’s not SNOW, good grief). The days are still warm, but the mornings and evenings have a definitely chill in the air. Personally, I’m loving it because I love fall, and I far prefer to sleep in the cool than the sticky heat! But the drop in temperature does signal that it’s time to switch up my skincare routine – my lips are starting to get a bit flaky again and the skin around my mouth is more sensitive and dry.
A few products landed at my door last month that have been ideal to help my skin transition into fall with ease: Korres Lip Butters in Guava and Pomegranate ($19CAD ea.), and the Greek Yoghurt Nourishing Primer ($39CAD) from the brand.

Though I have tried a couple Korres skincare products before, it’s been a while since I’ve dallied with the brand. I’ve read numerous reviews on their Lip Butters before, but didn’t know too much about their slew of Primers (they also have a Pomegranate Mattifying Primer, and a Quercetin & Oak Age-reversing Primer, as well as a plain Face Primer).

The Greek Yoghurt Nourishing Primer is a ‘skin-perfecting and silicone-free face primer‘ which is formulated with Greek yoghurt, which is touted to be very nourishing. Like any primer, it assists with improving makeup longevity and smoother application. This particular formulation, which is free of parabens or sulfates, is also supposed to be idea for sensitive skin, and has a ‘breathable gel texture that glides onto skin leaving a dewy finish.’ The texture is more like a cream-gel, which I like as it provides light moisture without being heavy. I also like that it’s silicone-free, which again keeps it from really feeling primer-ish on the skin. The only real turn-off I have is the scent, which is fairly strong and a mix of floral-herbal. I wore this for several days in a row, and it didn’t seem to cause any irritation to my skin, but I will be wary during use nonetheless. The scent does dissipate after a while.


I actually found that using this in the summer was OK – while it didn’t keep oiliness at bay, if used alone as my moisturizer/primer, it allowed my makeup to wear longer and I didn’t turn into a complete oil-slick. However, I think this will be particularly effective in the fall and winter, when my skin turns more normal than oily. I’m hoping it will be just the ticket to get a dewy, glowing look, rather than dehydrated due to moisture-sucking blustery cold days and indoor heating.
 Pomegranate Lip Butter
The Lip Butters are a lovely, medium-thick balm which applies easily to the lips and is not waxy in the least. It’s my favourite kind of texture to a balm – extremely comfortable to wear, yet doesn’t disappear in seconds requiring you to apply more every five minutes. And the scent isn’t too shabby either 😉 (it says it contains ‘aroma (flavour)’ in the ingredients but doesn’t elaborate what that could be – they also say that the product contains no synthetic fragrances, and so far it hasn’t caused any irritation for me, so we’ll just go with it)
 Pomegranate Lip Butter Ingredients
I’ve been wearing the Guava shade regularly (below) as my daily balm, as it’s just clear – as I said, my lips have been dry and rough the past week or so, and this has helped keep them hydrated and comfortable. I plan to start incorporating the Pomegranate shade (above), a ‘sheer coral’, into my lip wardrobe as well to give me that nice, stained lip that looks so lush in fall.
 Guava Lip Butter
 Guava Lip Butter Ingredients
I just want to note a few things that kind of alerted me when I first read the ingredients – polybutene is a liquid ogliomer which is used as a binding element in cosmetics and is derived from petroleum (EWG score of 1); trimethylolpropane triisostearate is a occlusive skin-conditioning agent (EWG score of 0); hydrogenated polydecene is a skin-conditioning agent (EWG score of 2); and polyethylene is a binding agent as well (EWG score of 1). The reason I wanted to share that is because as a consumer who reads ingredients, I was a bit concerned that all these things that sounded rather ominous – but turns out they’re relatively harmless.
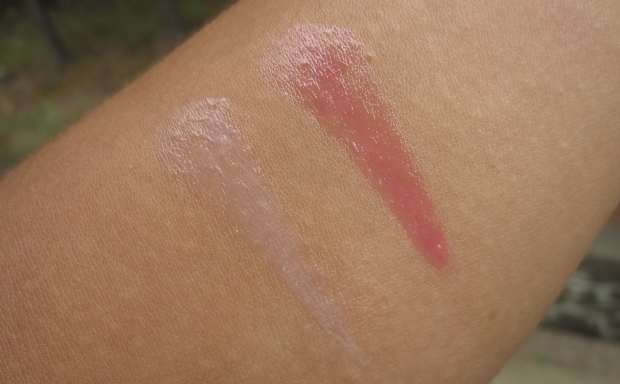 Swatches, left to right: Guava Lip Butter, Pomegranate Lip Butter
Overall, I’m pleased with these products and encouraged to try more Korres products in the future. Unfortunately, the brand is phasing out it’s makeup line to focus more on skincare, so I suspect primers and lip conditioners will be the extent of it’s offerings moving forward. Happily, both are quite lovely and there are primers to suit everyone’s needs, so it’s not a total loss! I’m really keen to see how the Greek Yoghurt primer works in the late fall/winter and if it gives me the dewy (and not greasy) look I’m always trying to achieve!

Have you tried Korres skincare products before? Do you ever use a primer to double as your moisturizer? What kind of texture do you like in a lip treatment?
*Products were provided by the PR company/brand for my unbiased consideration.
The easiest primer you’ll ever use: Skindinavia The Makeup Primer Spray
Posted by Latoya in Primer, Uncategorized on July 17, 2014
MAN how time flies in the summer! Here I’ve been having a blast, getting away from the city almost every weekend for the past two months, and here the blog ia getting more neglected by the day! It’s just the way I roll when the sun starts shining. Can’t say I’ve been missing it terribly – I spend enough time on a computer at work when I’d rather be outside – but I don’t want to fall completely off the radar, either. And so, here I am 🙂
Last month I was sent a sample of Skindinavia’s The Makeup Primer Spray ($35/4oz; $49/8oz) to try out, which couldn’t have been more timely due to the crazy humidity we’ve been having (not complaining of the heat though! No siree!). I was excited to try it out because the spray mechanism really appeals to me, and I figured it would feel a lot less heavy than your usual primers, which I tend to avoid save for events because I hate that extra layer of product. In addition, the product is non-comedogenic, as well as silicone- and oil-free, so you’re pretty much guaranteed for a light-as-air experience!
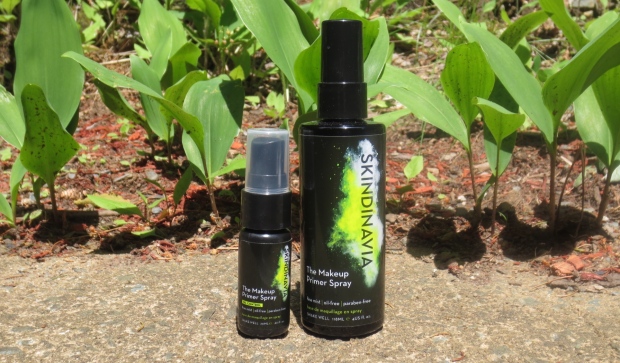 I also received a small sample of the ‘Oil Control’ version as well (on left)
The Makeup Primer Spray, like most other primers, is designed to help makeup go on smoother and last longer, and to help reduce the need for blotting throughout the day as it controls excess oil production and diminishes shine. At the same time, it’s also supposed to hold moisture in the skin by creating a lightweight, breathable ‘web.’ It also claims to help prevent redness, uneven skin tone, and large pores. Sounds pretty sweet, right?

Because sometimes I am not so smart, initially I imagined this as a makeup SETTING product, so I was using it after applying my makeup. OOPS. How you are supposed to use this, is to spritz the face in an ‘X’ motion, then apply your makeup shortly thereafter. It’s supposed to help foundation apply sheer to prevent caking, so obviously in order for this to happen you need to apply it while it’s still a bit damp. On this score, I found this to be true. I prefer my foundation sheer to just even out my skin tone, so the fact that this helps encourage this is a bonus.
However, the claims of oil-control, shine reduction and less need for blotting is JUST NOT TRUE, dudes. It *could* be this mega-humidity, but I find that more than anything this actually makes my skin look MORE greasy, unfortunately (same story with the ‘Oil Control’ version, too). By the end of the day, it’s shine-city! It’s almost fascinating in a way though, because it reminds me of model-dewy skin, you know, like this:

If I had flawless skin and was wearing (next to) no makeup, this would be all sorts of awesome. Mostly, though, it looks like this:
Which isn’t horrible I guess, but it’s a wee bit too shiny/greasy for my taste. Part of me just feels like I’m using it wrong, and if I could *just understand* I could get it to look more like the first photo. Or maybe I just need perfect skin for that to work. ~sigh~
Anyway, the moral of this story is that I think this does quite well on the moisture retention front, but not so great on the other points like keeping makeup in place or warding off the shine-ies. For those of you with drier skin, this might be a great bet – it’s also paraben-free and hypoallergenic, so it’s great for more sensitive skins. Because I’m stubborn, I’m going to keep trying to figure out how to get this to help me achieve that first-photo glow….I WILL find a way, dammit!
Have you tried a primer spray before? Which do you prefer: a matte, satin, or dewy skin look?
*Products were provided by the PR company/brand for my unbiased consideration.
Make Up For Ever HD Microperfecting Primer in 6 Yellow
Posted by Latoya in Make Up For Ever, Primer, Sephora, Uncategorized on June 16, 2014
For a beauty fiend, I’m actually relatively low maintenance. I shave when I think of it, I don’t always do my hair, and I can’t be bothered to do the little extra things that make you look that much more polished – like contouring or wearing primer. I reserve most of these activities (except the hair bit – I DO style it most days!) for special occasions so I look that much nicer when the time comes, which means that though I don’t use these items daily, I do still need to have them in my arsenal. One such item that’s been recently added to the mix is Make Up For Ever’s HD Microperfecting Primer in 6 Yellow ($39CAD for 1oz).

I’ve previously reviewed the original HD primer by MUFE in the neutral, universal shade – but it also comes in 6 other tones, each designed to correct a particular issue, such as redness, sallow-looking skin and dullness. I had a hard time choosing one from the options available, as I don’t feel that I have any of these concerns personally. In the end however, I chose 6 Yellow, which is designed to “lighten dark complexions“. I think I went with this one because I had just come back from Florida, and was super-dark. Let’s chat about it, shall we?

First of all, I really like the texture of this primer compared to other primers, and even compared to the original – it’s more like a smooth, medium-density lotion that spreads easily over the whole face (you only need a dime-size amount). It doesn’t feel silicone-heavy nor is it as runny as the original. It feels very lightweight and non-greasy. It claims to deeply nourish, moisturize, and soften the skin, enhancing the skin texture and preparing it for makeup application. Having skin the leans on the oilier side, especially as the months get warmer, I can’t really speak to how moisturizing this is – but it certainly isn’t drying; I found it didn’t keep the oilies at bay quite as well as I would have liked. For a drier skin however, I think the formulation of this would be quite nice and keep the skin plump and comfortable.

Another aspect of the primer that I didn’t really pick up on was the ‘lightening’ effect on my darker skin tone. I think that likely has a lot to do with the fact that I’m just not dark enough (lol) – I think this is really designed for a deep cocoa complexion to give some light to the face, which clearly isn’t me. However, I do think this would be effective on a darker skin tone, as you can see from the photo below that it does show up on my skin – it’s jut that once I blend it in, it’s unnoticeable (sort of like sunscreen). A darker skin tone would likely show the benefits much more.

Despite some of the qualities mentioned above, I will say that this primer does a nice job of enhancing the skin’s texture and giving it a soft finish. My skin looks smooth and airbrushed after application, and my pores are less noticeable, as you can see in the photos below:
 Before priming
 After priming
While this primer doesn’t tick all the boxes for me, I actually enjoy wearing it when it’s a bit cooler outside, or for evening – the texture is really lovely, and it feels like nothing on. I think in the winter I’ll get a good deal of use out of it, as it does prolong the wear of my makeup, and it may help to hydrate my skin and protect it from the blustery, cold weather. I kind of wish it has a sunscreen in it, so I could kill two birds with one stone (I really hate having to wear layers of product)!
Ingredients for reference:
Aqua (Water), Dimethicone, Trisiloxane, PEG-12 Dimethicone, Dimethicone/Vinyl Dimethicone Crosspolymer, Methylpropanediol, Butylene Glycol, Pentylene Glycol, Hydroxyethyl Acrylate/Sodium Acryloyldimethyl Taurate Copolymer, Squalane, Glyceryl Caprylate, Lauryl PEG/PPG-18/18 Methicone, Phenoxyethanol, Ceteth-10, Laureth-4, Ethylglycerin, Panthenol, Potassium Sorbate, Polysorbate 60, Parfum (Fragrance), Argania Spinosa Extract (Argania Spinosa Kernel Extract), C12-14 Pareth-12, Hydrolyzed Algin, Dodecene, Sorbitan Isostearate, Isostearyl Alcohol, Laminaria Digitata Extract, Polyaminopropyl Biguanide, Tromethamine, Biosaccharide Gum-1, Sodium Cocoyl Glutamate, Sodium Hyaluronate, Carbomer, Hexyl Cinnamal, Benzyl Salicylate, Limonene, Butylphenyl Methylpropional, Linalool. [CI 19140 (Yellow 5 Lake), CI 75470 (Carmine), CI 77007 (Ultramarines), CI 77288 (Chromium Oxide Greens), CI 77289 (Chromium Hydroxide Green), CI 77491 (Iron Oxides), CI 77492 (Iron Oxides), CI 77499 (Iron Oxides), CI 77742 (Manganese Violet), CI 77891 (Titanium Dioxide)].
Do you wear primers? Which one is your favourite?
*Products were sent by the PR company/brand for my unbiased consideration.
Final Empties Post of 2013!
Posted by Latoya in Alterna, Avene, Clinique, Conditioner, Deep Conditioner, Empties, Exfoliants, Green/Organic Beauty, Hair, Haus of Gloi, Indeed Labs, Lip Care, Lips, Make-up, Mascara, NARS, Primer, Sephora Brand, Serums, Styling Products on December 16, 2013
Woohoo! My last empties post of the year. As these are always lengthy (because I am too damn chatty) (and even though I just did one last month…how do I use up products so quickly?), I’m going to get right to it.

Organix Nourishing Coconut Milk Conditioner – I do like the Organix conditioners, and this worked quite well to hydrate and detangle, but I preferred the heaviness of the Macadamia Oil version to this. Smelled DELICIOUS in the summer though!
Earth Science Deep Conditioning Masque – 2nd tube of this, and I still feel the same as I did when I first tried it. It’s really good shit, dudes. For $13CAD, it’s one of the best deep conditioners I’ve ever used, and to top it off – all natural! If I were so fickle I’d buy another tube, and I still may…I’m just too curious to settle *just yet* 😉
Alterna Bamboo Smooth Kendi Oil – I really liked this oil a lot, much better than the Ojon Restorative oil that preceded it. It just had a great consistency and smell, and it never irritated my scalp or caused any breakouts around my forehead, which can happen with products like this. Good stuff, and lasted AGES.

Haus of Gloi Komodo Pumpkin Butter – don’t mistake mangosteen for mango, my friends – NOT THE SAME. I found the scent of this quite intrusive and it has this slightly rotten fruit smell…so ya, just not diggin’ it. So, I used it as a foot cream! Problem solved.
Nutiva Coconut Oil – great stuff. I used this as my primary body moisturizer throughout last spring/summer and it was awesome – it really kept my skin in great condition, prevented eczema flare-ups and helped heal old scars that I sometimes get from past eczema patches, which tend to result in the absence of pigmentation. However, once the weather cooled it wasn’t quite enough, so I would either layer it with a moisturizer, or use it in my hair periodically as a deep treatment. I’ll definitely be picking up another tub of this – so many uses! However, keep in mind that coconut oil is highly comedogenic – except when it’s in the form below:
Fractionated Coconut Oil – fractionated oil is non-comedogenic, perhaps due to having had all it’s triglycerides removed. It has a super-long shelf life and increased stability, and it’s antioxidant potential is more jacked up than regular coconut oil. It’s also in a TON of things and usually listed as ‘caprylic/capric triglyceride.’ My roommate had left this behind when she moved so I used it up – it was a lot easier to use than the solid coconut oil (though a bit messier at times) but I found it slightly less moisturizing on my body.

Getting through my non-organic products! I’ve only got a few last products and a couple straggler samples to get through and I’ll be essentially fully ‘green’, woot!
eos Lip Sphere – this balm works really well and was exceptional under lipstick, offering just enough hydration without much slip, but honestly the size of it sometimes felt very cumbersome. It’s a cute novelty, but not the most practical – though I do maintain that they’re terribly easy to find in your purse!
Indeed Labs Hydraluron – I’m sure this does have a purpose, but I don’t think I have dry or dehydrated enough skin to see a difference. I don’t miss it.
Clinique Even Better Clinical Dark Spot Corrector – this stuff does work well, for those of you not concerned about using non-organic products. I really do like serums because you can pile them on and they generally don’t have heavy moisture to the skin which can make you greasy as the day wears on.
RoC Soft Smoothing Scrub – too gentle for my liking, though this is a good choice for a morning cleanser just to wash the night’s oils off, or as a second cleanse. But as a ‘scrub’? No thanks. One more non-organic product down!
Avene Thermal Spring Water – I love misting my face before applying any serums or oils, as it just feels good to seal the moisture in…but paying for water in a can kinda irks me. I far prefer the facial mists with a little bit extra in them, like hydrosols etc. that add something more. Right now I’m using Kahina Giving Beauty’s Facial Mist and I quite like it (though its just so darn SMALL at 1.6oz for $46CAD…ouch!).

Samples! Lots of good organic stuff here. The Marie Veronique Organics Treatment Oil is excellent for keeping oily, pore-clogged, acne-prone skin in check. I don’t have the latter, but I do get clogged pores on my nose and cheek area, and I found the sample really refined my skin nicely. I actually just purchased the full-size last week! I tried the new Kahina Giving Beauty Fez Body Serum this past weekend, and while it worked nicely on my skin, the scent it NOT for me – far too spicy and heady for me. I’ll stick with my Lina Hanson Global Body Serum, thanks. The Soapwalla Deodorant sample lasted ages, and I enjoyed it so much I purchased it last week as well – it smells awesome and actually works a treat, even on wetness! It’s not entirely as effective as traditional antiperspirants, but for every day wear its perfect and I really like it a lot. I thought the Pai Chamomile & Rosehip Sensitive Skin Cream was gonna be my JAM for the dry patches I get sometimes from my eczema, but it sometimes made my skin itch a bit rather than soothe it, so I’ll have to keep looking for a nice nighttime hydrating cream. M.J.’s Calendula Cream on the other hand, was a freakin’ miracle product – this honestly cleared up my eczema overnight on my hands, which tends to be a persistent problem for me. I ended up buying a similar product from the local market, but I’m not sure it’s *quite* as effective, though I do like to support local. The Eminence Blueberry Soy Exfoliating Cleanser was a strange product. I used it as either a morning or second cleanse and I didn’t notice any exfoliating, and it left a slight film on my skin so I’d recommend using a washcloth to remove it. Not something I’d spend my money on, overall. The Rahua Shampoo was fine, but I didn’t enjoy the smell at all, and to spend $$ on a shampoo that I don’t love is just not gonna happen. One of our local high-end department stores here, Mills, will soon be stocking the organic brand Babor, and the SA’s gave me a few samples of this Calm & Relax Cream to try. It was pretty great, truth be told! I used it after doing an intense masque treatment, and it was soothing and hydrating without being heavy at all. I just may purchase a full-size when the line becomes fully available. Finally, another Eminence sample I snagged was this Red Currant Rapid Infusion Masque…suffice to say it was a total dud. I have no idea what it was supposed to do, but I wasn’t wowed. PASS.

Le makeup.
Sephora She Sparkles Gloss – decent gloss formula, decent shade. Despite the fact that I didn’t love it, I actually used this up fairly quickly in the grand gloss scheme of things. Huh.
NARS Gold Digger Gloss sample – HATE the brush on these Larger Than Life glosses, uh. So. Tiny! I liked the shade well enough, but the formula isn’t my favourite – similar to MAC lipglasses, which means they wear fairly well, but I’m not a fan of the stickiness. It still looks quite full here but I wasn’t getting any more product, so out it goes.
Marc Jacobs Blacquer Mascara – this was such a weird product, like webbing for the eyes! I loved that it had this kind of patent-leather shine, but it applied horribly and made a total mess of my lashes every time. Yuk.
MUFE Eyeshadow #17 Espresso – I thought I’d use this a ton and then hardly did. Then I dropped it and it crumbled, and then honestly, I just was OVER IT. Plus, I now have a similar shade in my Laura Mercier palette, so I don’t NEED YOU ANYMORE. *I really hate broken makeup!*
NARS Pro Prime Pore-Refining Primer – this was just meh. I used it regularly for a couple weeks to use it up, and I wasn’t wowed – I still got shine after a few hours, and though my makeup wore a bit longer, it wasn’t anything to write home about. Plus, non-organic…I’m not totally converted to organic makeup (or at all, really) but primer is like skincare, so I don’t think I’d buy this even if it did work well.
Marie Veronique Organics Everyday Coverage – the darkest shade offered is still too light for me, so this was a no-go. Bummer, as I’ve ready a lot of great things about it! Can’t beat coverage plus SPF in one.
I’m now finished my empties for the year! I was going to do a tally in each category, but honestly that’s just too much damn work LOL. Suffice to say, I feel really good about how many non-organic products I’ve used up, and I’m pretty stoked that I used up a whole gloss (and a half!) – I’ve been trying really hard to use up any lip products that are at least half-gone, because they’re much more feasible to finish (as opposed to blush…let’s not go there). I’m going to make a real effort next year to cull my stash to only products I really love – I know I’ve said this before, and I continue to make progress, but I think next year will be THE year. I’m loosening my grip on keeping things because they ‘should’ work or because they were expensive and therefore I have to use them. I just want to pull out any shade of any product and be like ‘Yep, looks great’ with minimal effort. I learn more and more what looks good on me and what doesn’t. And also, it’s a lot easier to reduce the stash when you focus all your effort / money on skincare!! I certainly haven’t saved a dime not buying makeup, because organic skincare costs a pretty penny in many cases, but the whole ritual of applying oils etc. is really up my alley, so I don’t mind. And less makeup means less anxiety in that area – I never overbuy skincare so I never have to worry about having too much of that!
So, out with the old (thinking) and in with the new (skincare, not makeup). Now I need to put my 2014 resolutions to paper!
How did your empties go this year? Do you think your reducing or expanding?
Hourglass Best of Hourglass Collection Has a Few Gems You Need to Try!
While some people are able to go away on vacation and continue to communicate with the outside world, I was pretty much MIA the entire time I was in New Zealand (there I go again!). Any time I wanted to access the internet, I had to pay for wireless or for computer time, and I was just not having it. In this day and age, it’s like paying for water (which also annoys me), so I pretty much forgot the whole idea except to periodically let my family and friends know I was alive.
However, when I got an email from Sephora’s PR giving me the opportunity to chose one of the sets from the holiday collections, I happily paid a few bucks in order to respond and select my set. Of all the offerings, the cream of the crop was most definitely Hourglass’ Best of Hourglass collection ($68CAD), which came with a travel size of their popular Veil Mineral Primer, a full size Film Noir Full Spectrum mascara in Onyx, a full size Extreme Sheen lipgloss in Ignite, and a deluxe sample of the new No. 28 Primer Serum. Hel-lo! How could I pass up on on these goodies!!?


As I had tried the Veil Mineral Primer before, in the travel size, and finished it, I was happy to have another small bottle to replace it (for a glowing, more thorough review on this product, see Liz’s post at Beauty Reductionista). The other three products were entirely new to me, and as anything I have tried from the brand has pretty much knocked my socks off, I was totally eager to get my grabby hands on them and play. First, let’s discuss the Film Noir Full Spectrum mascara:

To be clear, there is another Film Noir mascara that Hourglass makes, but it is the one that you paint on lash by lash. This is your regular bristle-brush mascara, and in reality the brush itself IS pretty regular. It doesn’t have any bells or whistles and looks pretty…normal, compared to every gimmicky brush that’s come out in the last few years. Don’t let that fool you, however! Though my pictures below don’t truly do it justice, this mascara is LOVELY. It separates my lashes perfectly while giving them some serious length as well as volume. It’s one of the few mascaras I’ve tried that I’ve actually gotten compliments on from people who aren’t bloggers (you guys count…but not in this instance because this is our BIZNESS, yo).


It’s a drier formula than I usually like, but I think it’s actually the *perfect* consistency – not really dry at all but not so wet that its glopping on and causing clumps. The brush really combs through the lashes each time, leaving them entirely clump-free. I didn’t have to separate my lashes in the photos above with a comb afterward at all, which is uncommon I find. It’s a total win. I would actually spend the $33CAD and buy this again! Note: There ARE parabens in the mascara.

Next, we have the Extreme Sheen gloss in Ignite, described as a ‘rose beige shimmer.’ I’d say this is more of a sheer shimmering gloss with a touch of beige more than anything, but it’s still pretty. To buy this separately would cost $33CAD so with that plus the mascara you’re almost have the price of the set alone – not too shabby! The gloss does have fragrance but it’s the last ingredient listed and it’s faint. I haven’t noticed any issues yet so hopefully it remains that way!


As you can see, the gloss is essentially colorless with a hint of shimmer. I typically like my glosses fairly opaque, but this somehow makes my lips look quite nice in the absence of pigment. It’s a nice way to punch up clear gloss, and it adds a subtle something extra layered over other lip colors. Surprisingly, the staying power is pretty decent even with its translucency, and it feels good on the lips – smooth and not sticky at all. I’d love to try this formula out in a few other shades.

Lastly, but far from least, is the No. 28 Primer Serum. I know it’s a cheap cop-out to put this marketing image versus the real thing, but to be honest – I don’t want to waste a drop of it’s precious contents. IT’S SO GOOD! And as much as I love you, I just can’t swatch this for no good reason. I’m hoarding it like crazy! At $75CAD for 1oz, you can probably understand why (though – I just saw that you can also get this in a travel size like the Veil primer – 0.33oz for $26CAD – sign me up!!).
Essentially the product combines the effects of a primer (reducing the look of pores, refining and smoothing the skin’s surface, and luminizing) with the treatment of a serum (strengthening skin’s moisture barrier, shielding against environmental aggressors, and hydrating). All this action means that the skin looks younger and dewier and AMAZING. It contains essential oils, lipid-rich plant oils, and vitamins to nuture the skin, while being free of parabens and fragrance.
DUDES. Not only does it sound amazing and make a whole lotta fabulous claims, but it delivers. I actually wore it for about 5 days straight (before remembering I can’t afford to buy the full size right now and hence it must be conserved), and my skin looked awesome. Not just while wearing makeup, but overall it was improving the look of my skin! It’s all sorts of YES PLEASE and believe you me I will be shelling out for this when the sample vial is finished. I love that it helps my makeup wear better. I love that it doesn’t make me greasy and in fact helps to control oil while still giving me a fresh, healthy look. I love that it doesn’t irritate my fussy skin one iota. The only thing I don’t love is the price, but I can get over that. When you think about it like a two-in-one product, primer + treatment, the cost doesn’t seem so outrageous. At least that’s what I’m telling myself.
So, basically, the moral of the story is, you need to buy this kit. Or if not the set itself, you need to try each and every one of these products at some point, especially the Primer Serum. I can’t imagine anyone NOT being happy with the collection, and it just reinforces my belief that Hourglass might just be the best makeup brand EVER. Just sayin’.
What do you think of Hourglass? Would you be willing to shell out for a product that produces results, or do you have a $$ limit? What makeup brand do you think is worth the hype?
*Product was sent for my unbiased consideration.
Review: Make Up For Ever Eye Prime Long Wear Eyelid Primer
Posted by Latoya in Make Up For Ever, Make-up, NARS, Primer, Sephora, Urban Decay on June 26, 2012
Hi-ho everyone!!! Tomorrow is the big day – we get our keys to the condo!! I have to admit that as easy as the whole process has been, it’s hard to fully focus on much else! All I want to do is move in and get settled and make the place look like home. On that note, this will be a relatively brief (which just means, less chatty!) post – a reprieve which I’m sure some of you will wholeheartedly appreciate 😛
I confess that I am by no means an eyelid primer connoisseur – most days I tend to skip it as I don’t really mind if my makeup has faded throughout the day (which actually sounds kinda weird…I don’t know what that’s all about). Actually, maybe I’m not that twisted – I think its more that most shadows/liners tend to adhere to my lids fairly well, and I only think about wearing primer either when I know I’m wearing a less-than-stellar product (wear-wise), or if I’m going to, shall we say, glisten more than usual (running on my lunch break, going dancing, wearing makeup on a particularly humid day). My past experiences have not taken me very far; I’ve tried Urban Decay’s Primer Potion ($24CAD for 0.37oz), which seemed to be the be-all-end-all since it was my first shot at lid primers, and then NARS’ Pro-Prime Smudge Proof Eyeshadow Base ($29CAD for 0.28oz), which is in my current rotation. After trying NARS, I realized I far preferred it to UD’s lid primer, which gave my lids a slight whitish cast (NARS’ blends to be translucent), was more difficult to blend (though by no means seriously problematic), and made my shadows much harder to blend. It did intensify my shadows more than NARS’; but this quality falls flat on me as I don’t quite appreciate that aspect.
Make Up For Ever, which by now seems to be synonymous with long-wear, waterproof makeup, has now come out with their very own eyelid primer, called Eye Prime ($25CAD for 0.18oz), which the brand states ‘reinforces eye shadow hold and intensifies its color.’ It’s enriched with waxes and mineral powders, and claims to have a ‘lightweight, non-drying texture’ that ‘blends seamlessly into the skin allowing a true-to-color eye shadow result that will not crease or fade.’ That sounds like it follows the pretty standard goal of all eyelid primers – so how did it pan out?
")
The delivery of Eye Prime is quite similar to NARS, with the same doe-foot applicator, though it’s a bit smaller which I find somewhat easier to use. The texture of the two are more alike than different, but NARS’ is more sheer and cream-like, while MUFE’s has more opacity and is somewhat drier. While Eye Prime does blend out to be almost undetectable on the eye, it still has some color, as it’s considered a ‘nude shade,’ while NARS’ truly blends out to completely invisible. I didn’t have any issues with the shade of Eye Prime showing up on my lids, but someone darker than I might be able to see it more. However, overall the color will suit the majority of skin tones.
") Make Up For Ever Eye Prime
Make Up For Ever Eye Prime
") Make Up For Ever Eye Prime – blended
Make Up For Ever Eye Prime – blended
I tried Eye Prime with one of my notoriously smudgy liners, Black Violet by Laura Mercier – a creamy near-black pencil liner with a lovely violet tone, but that smears within hours every single time. I applied Eye Prime around my eye area before using Black Violet, and wore the two for approximately 12 hours with the color still going strong and only the very slightest dull shadow of a smudge under the corner of my left eye. I would say that while wearing this primer with any other typical eye product (that doesn’t have extreme smudging issues), one would get 12 hours of wear and potentially more without experiencing any problems whatsoever.
 Top to bottom: NARS Smudge Proof Eyeshadow Base, Make Up For Ever Eye Prime
Overall, I’m quite pleased with Make Up For Ever’s foray into eyelid primers, and feel it’s a compliment to the line, and upholding their high standards in terms of long-wearing products. Though I must admit, from my experience, all of my MUFE products are designed to be long-wearing, and none of them have failed me in that regard, so the design of this product is sort of a moot point, no? At least, it’s really not required with any of the MUFE eye products I own, unless I felt I needed that extra insurance I guess. Nonetheless, for all my other, less tenacious eye makeup, this has been a great product to add to my slowly growing eyelid primer experience!
*Product provided by the brand/PR company for my unbiased consideration.
Fake Your Way to Fabulous: Make Up For Ever’s HD Complexion Starter Kit
Posted by Latoya in Foundation, Make Up For Ever, Make-up, Powder, Primer, Sephora on January 3, 2012
A couple weeks ago I received Make Up For Ever’s HD Complexion Starter Kit ($89CAD), and I have been giving it the good ol’ college try over the Holidays to see how it performed. Each product in the kit is designed to create a ‘soft focus’ effect, so that imperfections are concealed and blurred so they’re less visible. You may remember that I reviewed the Wild and Chic Best Of Make Up For Ever set back in November, which included the HD Microfinish Powder and the HD Microperfecting Primer – both are in the Complexion Starter kit, along with a great Kabuki brush, and your matching HD Invisible Cover Foundation shade, which you choose yourself. As I have never tried the HD foundation, I was unsure which shade to choose. I sent a photo of myself to the MUFE color experts, and they chose my shade, #155 (a medium beige), based on that. Happily, the shade matches (that’s what I call impressive!). Excitingly, they’ve also launched an interactive shade finder tool so that you can find your perfect shade in a similar fashion: www.hd.makeupforeverusa.com/shadefinder. This was created due to the fact that so many women are afraid to buy foundation online for the first time because they don’t know what shade they are – been there, SO done that! ") I’ve read conflicting reviews online about the HD Foundation, so I was a bit apprehensive initially. While some people swear by it, others seemed to swear…at it, truth be told. Being the good little beauty addict that I am, I made sure to read all about how to use it before moving ahead, as I find sometimes *but not always!* poor reviews can be due to incorrect use of a product (“It said to leave it on for 10 minutes, so I left it on for 30 and it burnt my face! This product SUX!!”).
I’ve read conflicting reviews online about the HD Foundation, so I was a bit apprehensive initially. While some people swear by it, others seemed to swear…at it, truth be told. Being the good little beauty addict that I am, I made sure to read all about how to use it before moving ahead, as I find sometimes *but not always!* poor reviews can be due to incorrect use of a product (“It said to leave it on for 10 minutes, so I left it on for 30 and it burnt my face! This product SUX!!”).  The recommended process is to start with a dime-size dollop of primer, smoothing it gently all over your face with your fingers or a sponge in a downward motion. Once it sets (in a few minutes), apply the HD foundation, again with fingers or a brush – only a small amount is needed to cover the entire face. Lastly, apply a small amount of the HD powder all-over with the kabuki brush. Of course, you can use any of these products separately but obviously will get the best effect with all three.
 ") I tried very hard to take photos of my face wearing this foundation, but unfortunately once again, my photography skills (and my camera’s abilities) fell short and it just wouldn’t showcase the foundation and the coverage properly. Also, as my skin is relatively clear of blemishes or other marks that needs coverage, it’s hard to display it’s effectiveness well.
I tried very hard to take photos of my face wearing this foundation, but unfortunately once again, my photography skills (and my camera’s abilities) fell short and it just wouldn’t showcase the foundation and the coverage properly. Also, as my skin is relatively clear of blemishes or other marks that needs coverage, it’s hard to display it’s effectiveness well.
Barring these shortcomings, here are my thoughts: After reading several reviews in which people complained it made their skin look oily, I thought the culprit could be using too much product – as it’s clearly specified that only a small amount is necessary. I personally found that it did NOT make my skin oily at all, and in fact made the two dry patches I have on my forehead a touch dry, if anything. Additionally, using the HD primer, which nourishes and moisturizes, helped to balance my skin so that the foundation wore better – which helped smooth over rough patches and create a better canvas for foundation. The difference maker of the three products though, is still the HD powder (and now the kabuki brush – oh my goodness this brush is AWESOME!) – instantly my skin looks flawless – poreless and smooth. I know some people are nervous about this product, but I still find it’s very effective and has become a staple in my every day routine. And I haven’t had ANY mishaps with visible whiteness showing up in photos!") Ultimately, I feel that these products can yield wonderful results – if you’re willing to take the time to use them properly. Not that it takes more time, necessarily, but just learning how to use them and then adhering to the process makes for an infinitely better experience. Of course, if you don’t want to have to fuss and just want to throw on a foundation and go, then this might not be the system for you – and that’s perfectly legitimate. But if you’re looking for a flawless finish, I definitely recommend at least trying this regime out – I think it’s worth a chance!
Ultimately, I feel that these products can yield wonderful results – if you’re willing to take the time to use them properly. Not that it takes more time, necessarily, but just learning how to use them and then adhering to the process makes for an infinitely better experience. Of course, if you don’t want to have to fuss and just want to throw on a foundation and go, then this might not be the system for you – and that’s perfectly legitimate. But if you’re looking for a flawless finish, I definitely recommend at least trying this regime out – I think it’s worth a chance!
Have you tried any of the MUFE HD products? What are your own feelings on them – love ’em or hate ’em? Are you willing to spend a bit of time in order to look your best?
*The products in this post were provided to me by the PR company/brand.
-
You are currently browsing the archives for the Primer category.


Must Reads
SERIES
BEST BANG FOR YOUR BUCK

MY COLLECTIONS

SUMMER POLISH COMBOS

